Sunday, March 26, 2006

Reading patterns...as clear as mud, right!

We met briefly after church today and our focus was on reading crochet patterns. I spent about 30 minutes reviewing the crochet abbreviations and we read real crochet patterns. Here are a few items everyone should keep in mind:
  • I think most people who "mess up" do so because they miscalculate the number of repeats in a pattern. You may want to abstain from watching TV and crocheting at the same time until you get a hold of the pattern. Once you do so, you should be able to do both nicely.
  • Remember to reserve enough time to finish a row or round and not to leave your work in the middle of the row (or round).
  • You can read a lot about how the pattern will proceed by reading the first bit of the instructions. For example, if you find that you are chaining a small number (such as 3 or 4 chains, then joining them, chances are you are going to be working on an item "in the round". If you start by chaining a large number (such as 25, 30 or 50), then you are probably working back and forth on a piece in rows.
  • Stuff contained within brackets are usually repeated a certain number of times. Read the directions inside brackets and note where the brackets begin and end before starting to crochet.
  • You may be asked to go back to a star or asterisk (*) after completing a set of instructions.
  • Instructions that tell you the final number of stitches at the end of each row are helpful (e.g. 15 dc).
  • When working in rows, count the number of stitches at the end of the row. Make sure that for the next several rows, you have the same number of stitches. If you don't keep track of this, your work will begin to get progressivly larger or smaller as you work. It's quite easy to add an extra stitch or drop a stitch without realizing it.
  • If the pattern frustrates you or you're getting bored with it, leave it and find another pattern.

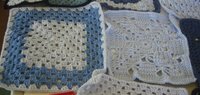
We also had a brief show and tell after our pattern reading session. Phyllis brought in some thread crochet doilies that were exquisite. They were quite tiny and as thin as a wafer. We also put all the squares together to see how many we had. Our grand total this week is 8. Here are some photos of the completed squares.

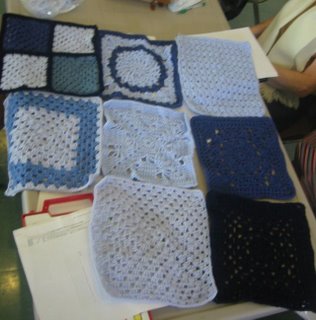
I wish I could have taken a better photo that wasn't so blurry.

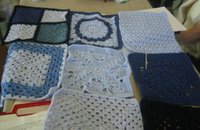
Another, clearer, collective photo

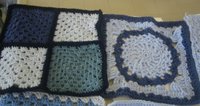
Martha made 3 mini-squares and Phyllis made 1.
They were all joined to make one 12" square (left).
Phyllis made the square with the circular pattern (right)

Gwen shows a great use of two colours (left). Phyllis made a pretty butterfly square (right).

A special thanks, again, to Leanne who had taken the squares home last weekend and sewed in all the ends!

Next week, we'll decide how many squares we'll need to put together our first project. We're undecided as to whether to make the afghan square or rectangular. We're also not sure whether to put together 9-12" squares in a 3x3 configuration or 12-12" squares in a 3x4 configuration.

Keep those squares a comin'

Sunday, March 19, 2006

We're off and there's no looking back!

It was nice to see so many people crocheting this afternoon at the church. A hearty welcome to our newest member, Paul, who joined us last week.

We've come so far in only 3 weeks. Here's a snapshot of our progress:
  • Five - 12" squares have been completed (incredible progress!!) and I haven't even started mine yet
  • 3 people are working on 12" Yo-Yo squares
  • 1 person is making a modified square from the 63 granny square afghan book
  • 3-4 people are making traditional granny squares
  • The remaining crocheters are refining their stitches (single crochet and double crochet)
Leanne has taken the completed granny squares home and has volunteered to sew in the loose ends - way to go Leanne! We need to decide what we're going to do with our first blanket. I think it'll be completed much sooner than I thought!

Kudos to:
  • Martha who has completed 3 - 6" granny squares.
  • Phyllis who has picked some complex-looking square patterns for her gorgeous 12" squares
  • Gwen who has some pretty impressive colour-work in her 12" squares.
Next week, I'll spend about 20-30 minutes devoting time to reading crochet patterns. I noticed that a few of our crocheters have crocheted before but had difficulty reading patterns. If you have a pattern at home that has mystified you, please bring it with you to next Sunday's meeting and we'll decifer it.

Also next Sunday, I'll be bringing a crochet skills inventory for everyone to complete. Essentially, if you can check off the skills that you've learned, you'll have a better idea of where you are in your learning curve. Once you have all the skills checked on your list, you can move on to the next level.

So far, I have the following skills on the inventory list:
  • Slip knots
  • Chains (ch)
  • Single crochet (sc)
  • Double crochet (dc)
  • Slip stitch (sl st)
  • Finishing off (FO)
  • Sewing in ends
  • Reading a basic pattern
I forgot to bring the flipchart sheet home that had all the skills listed. If I've missed something that you remember seeing on the sheet, just note it in the comments for me.

Finally, I need to remember to bring my camera with me next week. I'd love to get a photo of the squares that have been completed so I can post them to the blog.

I look forward to seeing everyone on Sunday. Excellent work!

Monday, March 06, 2006

Charitable Organizations

I thought I'd do a little research into charities that would welcome donated goods in the GTA area. Click on the organization name to visit their web site. Here's a list of what I found:

Angel Hugs - Angel Hugs is a non-profit charity group that knits, crochets and quilts for those who face trauma, crisis or life threatening illness.

Project Linus Canada
- Project Linus is a 100% volunteer non-profit organization. It is our mission to provide love, a sense of security, warmth and comfort to children who are seriously ill, traumatized or otherwise in need through the gifts of NEW, HOMEMADE, WASHABLE blankets and afghans, lovingly crafted by volunteer blanketeers.

Teddies for Tragedies
- In 1998 Teddies for Tragedies website was created.
Today we have volunteers all over the world knitting/crocheting 10" teddy bears for children traumatized because of war, bad weather or poverty.

The Crochetville Forum has an entire section devoted to charity crocheting with requests for every conceivable cause.

Sunday, March 05, 2006

Crochet Class Completed!

Hi Ladies:

You've made it to the blog. Congrats!

I really enjoyed our time of fellowship today and hope that you were able to learn some crochet skills. We'll meet again next week at the same time if you're interested in continuing with your lessons.

If you would like to see the different granny squares available, there are some web site links you can visit on the right side of this blog.

If you need crochet help, you can visit the following online tutorial web sites:
Crochet Pattern Central has an entire page with links you can visit to "hone your skills"
Crochet at About.com has some links you can visit
Crochet Cabana - if you visit this page, you'll need to scroll down about halfway to find the stuff
There's lots more. Just go to Google and type "learn to crochet" online tutorial (exactly as I've written it, quotes and all) and see what you can find!

I thought I'd post a few photos of our time together today:

My goodness, there were so many of us I could only get half the class in this photo!


If you'd like the pattern for Lorraine McGillivray's 12" square, here it is (I can always help you get started next week, if you'd prefer to wait):

Row 1: Chain 52. Measure the chain, it should be about 11" long. If you find that the chain is waaay larger, "frog" a few chains. As your work grows, it'll stretch to about 12" depending upon your tension. Keep your chains loose so that you'll be able to fit your hook into them when working Row 2.

Row 2:

  • Turn your work.
  • Double crochet (dc) in first chain.
  • Chain 1
  • Skip one chain, then double crochet (dc) in next chain.
  • Repeat steps #4 and #5 across the row until you reach the end.

Row 3:

  1. Turn your work
  2. Chain 4
  3. Double crochet (dc) in the chain 1 space in the row below, chain 1
  4. Repeat Step #3 until you reach the end of the row.

Repeat Row 3 until your square measures 12" (you'll see a pattern emerging after a few rows).

Here's a photo of the finished square:

If you have a crochet question or like to leave a comment (so that I know you've visited the blog), click the Comment link underneath this post and "fire away". I'll see you next Sunday!